1) In order to ensure your images are sharp, make sure you know how to focus your camera. Digital cameras with auto focus are often difficult to focus precisely, especially when shooting small objects.
Read your owner's manual and be sure you understand how your camera's auto focus operates. Most digital cameras are designed to easily focus on large objects but have difficulty on small subjects. It is often useful to put your camera in spot focus mode. Spot focus will give you more control over what part of a scene the camera is actually focusing on.
2) Use a tripod, even the slightest movement while taking a picture will cause motion blur. The closer you get to an object the more obvious the motion blur becomes. Even an inexpensive tripod will make a big difference in the sharpness of your images. For really sharp images it makes sense to invest in a good, sturdy tripod. If your camera has a remote shutter release then use it, if not then use the camera's built-in timer to minimize camera shake.
3) To get the largest area of your subject in focus put your camera in aperture priority mode and set the aperture to the highest number possible. The closer you get to your subject the more important this becomes.
4) Use soft lighting. Your camera's built-in flash will rarely give good results for product photography. For soft lighting either shoot outside on an overcast day or use a light tent like the EZcube®, or use a soft box.
5) Use image editing software. Even inexpensive software like Photoshop Elements™ can make your product photography much easier. It may seem like it's faster to use an image exactly as it was shot. But in reality, it is difficult to shoot an image precisely how you would like it to appear in it's final form. Image editing software allows you to crop an image, adjust it's exposure, sharpen the image and then resize it, often in less than 60 seconds.
The biggest difference between an amateur's product snapshot and a professional's product image are sharpness and lighting. Steps 1,2, and 3, will improve the sharpness of your images while Step 4 will improve your lighting. A minute spent editing an image will improve it further. Because these few steps seem so basic, it's tempting to ignore them. However, if you take the time to follow them, you will see a huge improvement in the quality of your images.
An easy way to determine if lighting is soft or hard
You will often read that soft lighting is the best type of lighting for product photography, and that is true. However, unless you have a lot of experience with lighting, it can sometimes be difficult to determine if lighting is soft or hard. Here's a simple way to check to see if you have soft or hard lighting. This method works well both indoors or outdoors and the only equipment it requires is your hands.
Hold your left hand out, keep it flat and slightly in front of you. Now hold a finger from your right hand a few inches above your left hand. Take a look at the shadow cast by your finger. A hard shadow indicates you have hard light conditions, a soft shadow means that the lighting is soft.
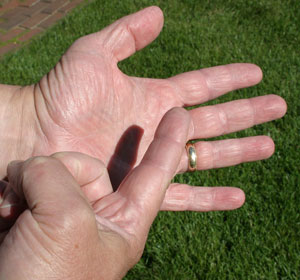
Direct sunlight produces a hard shadow
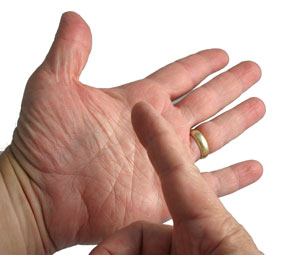
Soft light inside a light tent produces a soft shadow
Once you have tried this a few times you will see that you can even tell how soft or hard the light is. And if you look carefully you will even be able to tell if the light is actually coming from multiple sources.
source :
http://www.tabletopstudio.com/TTS_Product_Photography_Tips.html


"To get the largest area of your subject in focus put your camera in aperture priority mode and set the aperture to the highest number possible" nice suggestion! This is the common mistakes I always encounter in my photography.
ReplyDelete